Stainless steel filter elements are designed to be cleaned and reused, but the cleaning procedure itself determines whether that reuse is safe. A filter returned to service with embedded contaminants, residual chemical cleaner, or microscopic media damage will restrict flow, destabilise differential pressure, and potentially introduce contamination into the downstream process.
A common challenge in industrial plants is that filter cleaning gets treated as a simple rinse-and-reinstall task. In high-solids applications, such as chemical processing, fuel oil filtration, and high-temperature water treatment, the approach accelerates media fatigue, shortens service life, and increases the frequency of unplanned changeouts.
This guide covers the correct cleaning sequence for industrial stainless steel filter cartridges: from isolation and inspection through to chemical soak, backflushing, drying, and reinstallation. It also covers deep-cleaning options for heavily fouled elements, post-cleaning troubleshooting, and indicators that a unit has reached the end of its serviceable life.
Before You Start: Safety and Preparation
Preparation protects production assets and reduces liability during filter maintenance. Isolate the system and release internal pressure before accessing the cartridge housing. Residual pressure can expel media and damage adjacent equipment. Turn off power sources in accordance with site safety protocols.
Ensure that approved tools and materials are available before removing the filter element. Use cleaning agents that align with the manufacturer’s manual and facility standards.
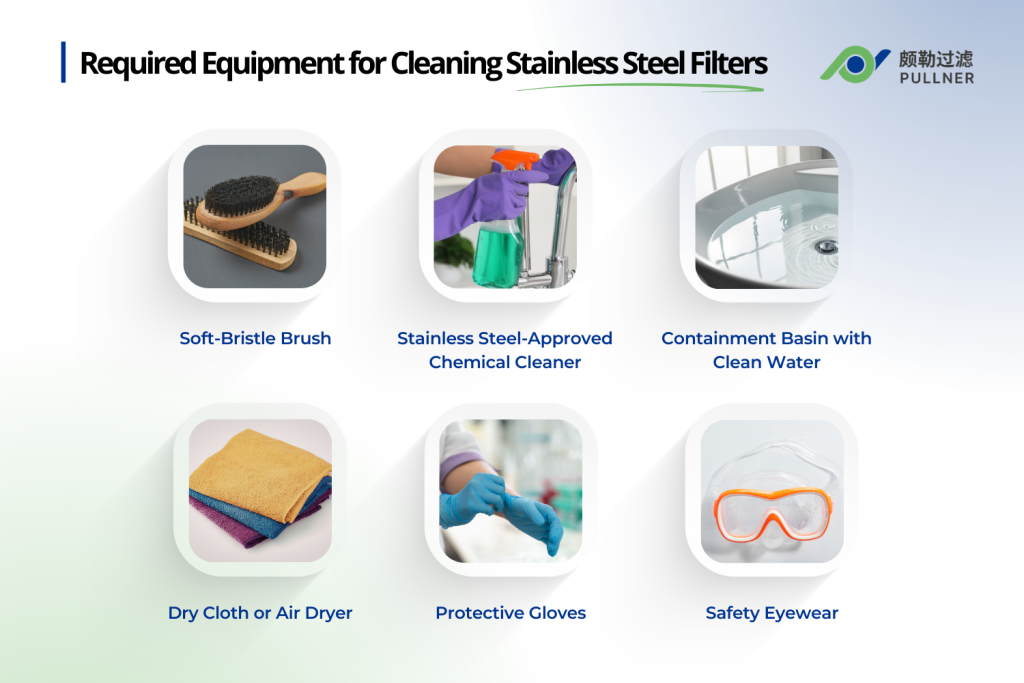
Required equipment includes:
- Soft-bristle brush
- Stainless steel-approved chemical cleaner
- Containment basin with clean water
- Dry cloth or air dryer
- Protective gloves
- Safety eyewear
Step‑by‑Step: Basic Cleaning Method
Follow this step-by-step method to meet rated flow and pressure targets. The process defines how to clean stainless steel filters within controlled operating environments.
You remove debris from the filter, apply an approved solution to clean the filter surface, and then inspect structural supports. If inspection confirms damage, you remove the old filter from service and install a qualified replacement before restart.
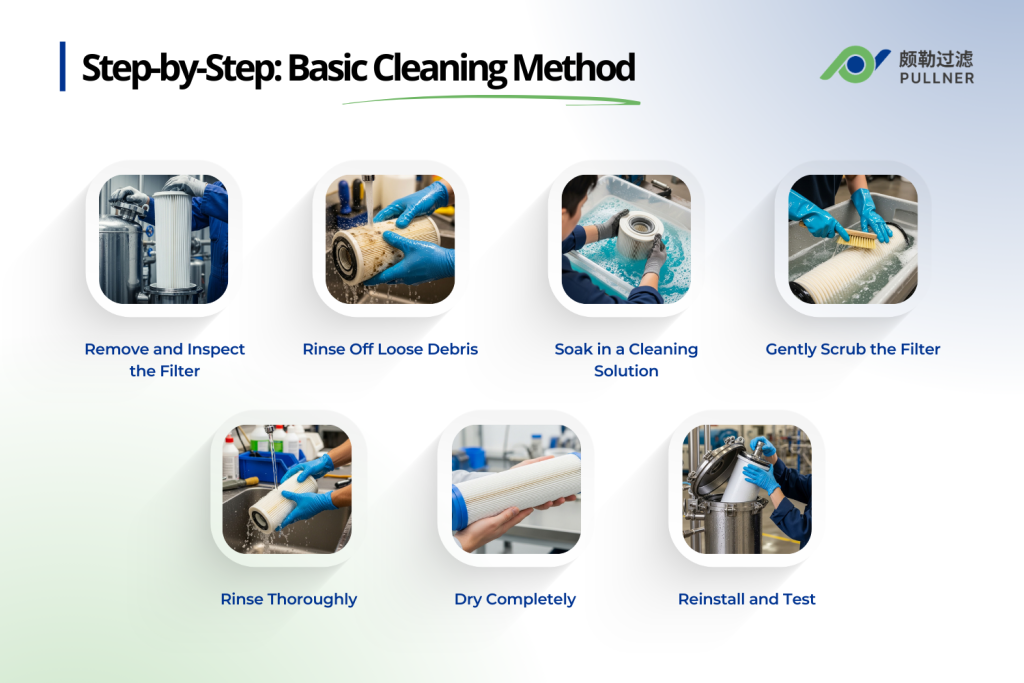
Remove and Inspect the Filter
Open the housing carefully and remove the stainless steel filter element without stressing the frame. Position the filter on a stable surface with adequate lighting for review. If the filter uses woven mesh, support the component evenly to prevent mesh distortion during handling. Sintered or porous metal designs require stable placement to avoid structural stress.
Inspect the surface for cracks, fatigue, or heavy corrosion. If structural damage appears, remove the old filter from active service and deploy a compliant replacement. If the structure remains intact, proceed to clean the filter in accordance with site maintenance standards.
Rinse Off Loose Debris
Begin with a controlled water rinse to clear surface dirt before deeper cleaning. This initial step protects the filter by preventing debris from becoming embedded during subsequent treatment. Early flushing also reduces contamination that could interfere with chemical solutions.
Rotate the component steadily to dislodge trapped particle buildup. Rotation exposes recessed areas in woven designs and internal pathways in sintered structures. The rinse removes dust and impurities before they migrate further into the filtration media.
Soak in a Cleaning Solution
Prepare a cleaning solution by mixing warm water with a mild, non-chloride detergent or a stainless steel-specific chemical cleaner, following the product label and the filter manufacturer’s instructions. Review the service manual first, since thin-gauge media or tight micron-rated filter designs can degrade under aggressive formulations.
Place the filter or cartridge in an approved containment vessel and fully submerge the component. Maintain a dwell time of 15 to 30 minutes per manufacturer guidance. Agitate the unit at defined intervals to circulate fresh solution and break down residual oil within internal passages.
Gently Scrub the Filter
Use a soft-bristle nylon or natural brush on the filter element after soaking. Avoid steel wool or metal brushes because those tools can embed carbon steel and initiate corrosion. Abrasive pads can also strip the protective oxide layer from stainless surfaces.
Scrub along the weave or perforation pattern to dislodge compacted dirt without distorting openings. Focus on seams and support frames where each trapped particle accumulates during operation. Apply light, even pressure to preserve micron tolerances and maintain rated flow through the filter.
Rinse Thoroughly
Flush the filter with clean, running water until all traces of soap or chemical agents clear from the surface. Residual cleaners can cause discoloration or rainbow staining if allowed to dry. Direct water from the clean side toward the dirty side to backflush loosened debris from the mesh or sintered pores.
Inspect the filter element under bright light to confirm no compacted material remains at wire intersections or seams. If residue persists, repeat the soak-and-scrub cycle before reinstallation. When servicing high-precision units, use deionized or distilled water for the final rinse to prevent mineral spotting caused by dust and impurities in the supply water.
Dry Completely
Remove surface water immediately after rinsing. Shake the component gently, then pat dry with a lint-free or microfiber cloth to prevent fiber residue. Avoid standard paper towels that can leave fibers trapped in mesh openings. Prompt drying reduces mineral deposits within sintered pores and at wire intersections.
Use filtered, oil-free compressed air or a dedicated dryer to reach enclosed passages and pleated sections. Direct airflow to blow moisture from recessed areas that clothes cannot access. Confirm the unit is fully dry before reinstallation to limit microbial growth and support restoration of the protective oxide layer.
Reinstall and Test
Conduct a final inspection under bright light before reinstallation. Confirm no lint, moisture, or dislodged debris remains on the component or inside the housing. Use low-pressure compressed air to blow out the enclosure if needed, taking care not to disturb sealing surfaces.
Inspect O-rings and gaskets for cracks or flat spots. Apply approved lubricant when specified to maintain seal integrity. Refit the element carefully and center it on support guides to prevent bypass. Repressurize the system gradually and monitor differential readings to confirm stable operation while residual air is being purged from the housing.
Deep Cleaning Options for Heavily Soiled Filters
Use deep cleaning only when routine washing fails to restore acceptable differential pressure.
Persistent grease or mineral scale indicates the need for escalation. Follow manufacturer limits for micron-rated media. After treatment, apply filtered, oil-free compressed air to blow residual solution from internal passages before inspection.
Longer Soaking Times
Extend dwell intervals when standard soaking fails to reduce differential pressure. Heavy organic residue or mineral scale may require several hours to penetrate the depth media. Follow manufacturer limits before increasing exposure time.
Replace the cleaning solution once it becomes saturated or visibly discolored. Fresh solution maintains chemical activity and improves contaminant breakdown. After soaking, use filtered, oil-free compressed air to blow residual fluid from internal passages before final inspection.
Specialized Stainless Steel Cleaners
Select cleaners based on contaminant type and media tolerance. Use alkaline degreasers for heavy oil loading. Choose citric-acid-based descalers when mineral scale restricts flow. Confirm chemical compatibility with the stainless alloy to protect the passive chromium oxide layer.
Follow specified contact times without deviation. If an alkaline degreaser or acid-based descaler was used, neutralize the element before the final rinse – typically by flushing with a dilute bicarbonate solution for alkaline agents, or a dilute alkaline rinse for acid-based cleaners, following the chemical supplier’s instructions. Skipping this step can leave active chemistry on the media surface, accelerating corrosion of the stainless alloy and degrading O-ring seals during reinstallation.
After rinsing, apply filtered, oil-free compressed air to blow residual moisture from internal passages and support a controlled return to service.
In demanding environments, the filter’s construction determines how well it tolerates cleaning. Pullner’s Stainless Steel Filter Cartridges are designed for high-temperature, corrosive media and high-pressure industrial applications where standard polymer cartridges would degrade.
These cartridges use sintered or multi-layered stainless steel structures engineered to withstand repeated chemical cleaning, backflushing, and pressure cycles without losing micron stability. That durability matters in maintenance programs because robust stainless steel construction allows deeper cleaning methods to restore flow and differential pressure without compromising the structure or shortening the service life.
Backflushing or Gentle Pressure Cleaning (If Allowed)
Use reverse-flow rinsing to support advanced filter cleaning when routine washing fails to restore acceptable differential pressure. Persistent restriction can indicate the need for escalation.
Direct water from the clean side toward the dirty side to dislodge embedded debris. Confirm that the support structure is rated for reverse pressure before washing the media to avoid pleat collapse.
Apply a controlled spray under 30 PSI and remain within the manufacturer’s pressure and flow limits. Treat 30 PSI as a general reference point, not a universal standard.
Stay within the manufacturer’s pressure and flow limits throughout the wash cycle. Complete a thorough final rinse before drying so no residual solution remains. Avoid aggressive solvent use unless manufacturer guidance permits chemical escalation.
Troubleshooting After Cleaning
Review system performance after filter cleaning to confirm restoration of rated flow and pressure stability. Persistent deviation can indicate internal fouling or structural damage that a routine wash may not have resolved. Investigate the root causes before returning the unit to sustained operation.
Diagnostic actions include:
- Analyze Differential Pressure: Determine whether sub-micron loading has blinded the media and sustained elevated readings.
- Inspect for Media Migration: Identify loose wires or frayed edges that indicate structural breakdown and require replacement.
- Detect Bypass Leaks: Confirm whether low pressure and reduced efficiency are due to misalignment or seal failure.
- Identify Structural Deformation: Discard elements showing pleat collapse or warped frames that permanently restrict flow.
- Evaluate Pitting Corrosion: Examine surfaces for localized attack linked to prior chemical or solvent exposure.
- Verify Seal Seating: Confirm gaskets and O-rings maintain compression without permanent set.
- Check Upstream and Downstream Obstructions: Rule out external restrictions that affect system performance.
- Execute a Cross-Chemical Second Wash: Apply a second wash using alternative approved chemistry.
- Monitor Cleaning Frequency: Assess whether repeated wash cycles indicate process incompatibility.
- Consult Manufacturer Limits: Seek technical guidance if performance fails to return after validated cleaning.
Routine Maintenance and Best Practices
Schedule filter cleaning based on differential pressure rather than a fixed calendar interval. Record the clean baseline reading of a new element under normal load for comparison. Light, frequent wash cycles can protect media performance more effectively than infrequent deep buildup removal.
Best practice guidelines include:
- Clean Based on Differential Pressure: Initiate each wash when readings reach the manufacturer’s trigger point.
- Establish a Performance Baseline: Document initial differential pressure for future troubleshooting reference.
- Perform Light, Frequent Cleanings: Use a controlled wash approach to reduce long-term fouling risk.
- Inspect Seals and Gaskets: Replace compromised seals to prevent bypass and protect downstream equipment.
- Conduct Inter-Cycle Visual Checks: Examine surfaces for corrosion, dents, or scratches that weaken structural integrity.
- Store in a Climate-Controlled Area: Maintain humidity below 60% RH to reduce condensation exposure.
- Maintain Original Packaging: Keep spare elements protected from dust, oil mist, and UV exposure.
- Avoid Carbon Steel Contact: Prevent ferrous contamination from tools or grinding debris.
- Elevate Off the Floor: Place components on clean racks to avoid moisture transfer.
- Implement Handling Discipline: Use approved tools and avoid deformation during storage or transport.
Working With a Filtration Partner Who Understands the Process
Cleaning and maintaining stainless steel filters extends service life, but long-term reliability depends on selecting the right cartridge design for the conditions. Pullner Filter supports industrial operators with engineered stainless steel filter cartridges designed for high-temperature service, corrosive media, and high-pressure applications.
Pullner Filter works as your technical partner, helping evaluate operating conditions, contamination profiles, and cleaning methods to recommend cartridges that maintain flow stability and withstand repeated cycles.
Contact our specialists to discuss your filtration needs and identify a cartridge solution that supports them.
How to Clean Stainless Steel Filters | FAQ
When does it make sense to choose stainless steel filters over disposable cartridges?
Select stainless steel elements when high dirt loading or frequent changeouts drive high disposable costs.
These units support clean-in-place processes, allowing operators to wash and reuse components rather than replace single-use cartridges. Reusable construction reduces waste and supports longer-term asset planning.
Which process conditions most affect the service life of stainless steel filters?
Service life depends on solids loading, pressure cycling, and chemical compatibility. Repeated flow surges increase mechanical stress on micron-rated media. Temperature extremes and off-spec chemistry can accelerate corrosion or structural fatigue. Stable operating conditions extend usable life.
What records should a plant keep for stainless steel filter maintenance and inspections?
Maintain detailed logs for each installed element. Record installation dates, differential pressure trends, and every cleaning event. Document inspection findings such as damage, corrosion, or seal wear. Note the final replacement date and the reason for removal to support root-cause analysis.
Can all stainless steel filter elements be cleaned, or are some designs single-use?
Most stainless steel elements are designed to be cleaned and reused, but not every design supports repeated regeneration. Some fine micron or specialty composite designs may have structural limits that restrict aggressive cleaning or repeated reuse. Always confirm the manufacturer’s guidance and the media’s chemical and pressure tolerance before applying deep cleaning methods.
How do you know when a stainless steel element has reached the end of its service life and should be replaced rather than cleaned again?
Replace the element when cleaning no longer restores a stable flow or acceptable differential pressure. Other clear indicators include structural damage such as warped frames, pleat collapse, cracked welds, frayed mesh, or corrosion that compromises the media.
If repeated cleaning cycles leave persistent fouling or seal failure, the filter has most likely reached the end of its serviceable life and should be replaced.
Back to Top: How to Clean Stainless Steel Filters